This post contains affiliate links which we are compensated for if a purchase is made. Using links costs you nothing and helps to support the ongoing creation of content. Thank you for using them.
Do I Really Need A Wort Chiller? Can I Leave The Wort To Cool Overnight? If you have just started out brewing and possibly purchased your starter kit for home brewing from somewhere like Northern Brewers you will notice that it doesn’t contain a wort chiller. Do you really need a wort chiller? And does that mean can leave the wort to cool overnight?
A wort chiller is not an absolutely essential piece of equipment for homebrewing, however, it is highly recommended if you do not have the capacity to cool the pot that contains the wort in an ice bath. Allowing the wort to cool slowly increases the risk of infection and can affect the flavor and clarity of the beer.
The reason it is important to cool wort quickly is that it reduces the amount of time that the wort is exposed to conditions that favor the growth and development of unwanted bacteria and wild yeast. At temperatures above 140°F bacteria and wild yeasts are inhibited, however, once that temperature falls below that point it is important to ensure that the wort is not allowed to linger too long before fermentation starts.
Additionally, during the boiling process, dimethyl sulfide is produced which is vaporizes at high temperatures. However, if the wort is cooled slowly, dimethyl sulfide continues to be produced at elevated temperatures that are not sufficiently high to cause the dimethyl sulfide to be removed. The presence of dimethyl sulfide creates sulfury flavors in the finished beer.
The other negative factor is that results from cooling the wort slowly are that it affects the clarity of the beer. There are proteins within the wort that require a rapid reduction in temperature to cause them to coagulate out of solution. Slow cooling results in the formation of small crystals within the brew that can be re-dissolved at warmer temperatures and do not fall out of suspension. This crystal structure results in the appearance of a haze when the beer is chilled.
How To Cool The Wort Without A Chiller
There are a couple of methods that can be used to cool the wort after the boil, these techniques are best suited to relatively small batches that are 5 gallons or less. At batches above this size, it is difficult to move hot pots around.
The most common method used to cool the wort is to transfer the pot to a sink that is filled with cold water. Depending upon the size of the sink it may be necessary to replace the water after 5 minutes or so to ensure that the wort is cooled rapidly, alternatively, ice may be used to keep the temperature of the cooling water low.
If your sink is too small it may be necessary to use your bathtub, however, you need to be careful not to place the pot into a bath without water. Many bathtubs these days are made of fiberglass which is not designed to tolerate high temperatures. Direct contact with the base of a pot is likely to cause scorching or warping of the bottom of the bathtub.
When cooling the wort it is best to keep the pot lid on as it reduces the chances of contamination, however, many brewers like to stir the wort when cooling it as this will accelerate the cooling by maximizing the contact with the side of the pot. Stirring should be done gently to ensure that the amount of splashing is kept at a minimum as this will reduce the degree of oxidation that occurs by minimizing the surface area of the wort that is exposed to the air.
If you choose to stir it is important to sanitize the spoon as this could be a source of contamination. The wort should typically take approximately half an hour to 3/4 of an hour to cool completely.
The other way is to add ice directly to the wort which works well provided that the ice used is not commercially available ice or made from untreated local tap water. The reason this can be a problem is that certain types of bacteria can survive in ice.
If you want to use this method you will need to boil the water prior to freezing, additionally, it is important to freeze water in a sealed container to avoid any chance of contamination from other things that are in the freezer.
Are There Different Types Of Wort Chillers?
Wort chillers can be divided up into three types; immersion chillers, which are the most common, counterflow chillers, and plate chillers.
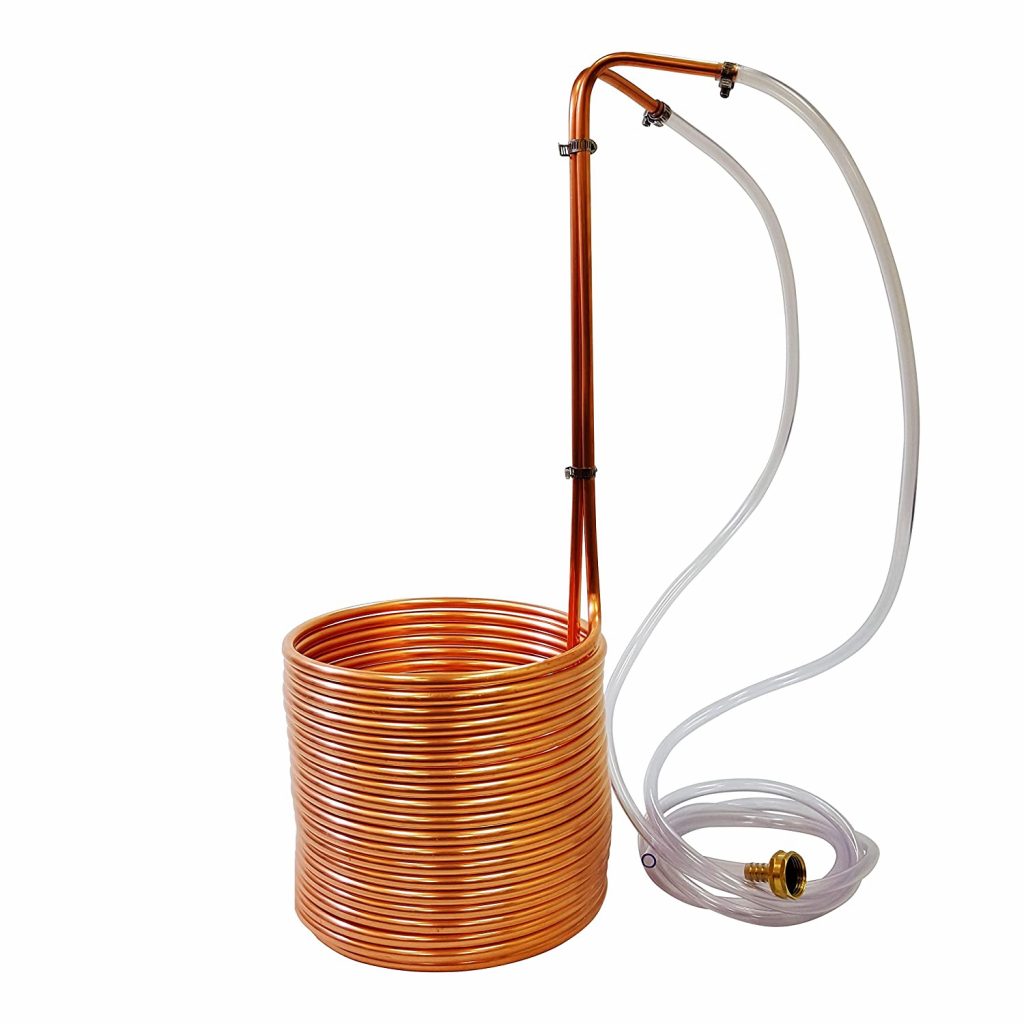
Immersion chillers, as the name suggests, are coolers that are immersed in the wort itself. They are made of hollow metal tubing with an inlet and outlet tube which is designed to carry cool water through the tubing to remove heat from the wort. This type of chiller is generally easy to use and clean and is relatively low in cost but it is not as efficient as other cooling systems.
This type of chilling unit is suitable for cooling wort down and it can also be used in conjunction with other components as part of the temperature control system during the fermentation stage, to read more about this click here.
A counterflow chiller setup consists of a set of concentric tubes (one within the other). The central tube which is usually made of a metal like copper carries the hot wort through the tube. Cooling water is channeled through the outer tube cooling the inner tube containing the wort. It is called a counterflow chiller because the wort flows in the opposite direction to the cooling water. The advantage of a counterflow chiller is that it is more efficient than a submersion cooler but they are more complicated to set-up, require a pump and more difficult to clean.
Plate chillers work in a similar to counterflow coolers but they are much more efficient. They have are multiple channels for the wort to pass through that are surrounded by layers of chilling water. The multiple channels create a much greater surface area for heat exchange which means that the plate coolers are more efficient.
However, these types of units require a pump to move the wort through the chiller which adds additional expense. Additionally, the units themselves are significantly more expensive.
How Does The Cooling Times Compare Between Different Types Of Wort Chillers?
A study that was conducted by Brad Probert demonstrated the cooling times that might be expected from different types of chillers with a 6 Gallon batch falling from 200°F to 70°F (93°C to 21°C). It was found that a basic immersion chiller would cool the batch in around 15 minutes, however, that could be improved by around 5 minutes by maximizing water flow and using a chiller with a larger coil size to increase the flow rate.
The counterflow chiller reduced the time to 3 to 4 minutes while the plate chiller reduced it to 2 minutes. However, it was noted that the smaller plate chillers were not nearly as efficient, reducing the heat over an 8 minute period due to a reduced flow rate of the coolant. A summary of the results shown in the table below.
| Chiller Type | Flow Rate (gallons per minute) | Chill Time (minutes) |
| Small Immersion Chiller | 3.3 | 14.56 |
| Large Immersion Chiller | 4.9 | 8.56 |
| Counterflow Chiller | 4.5 | 3.39 |
| Small Plate Chiller | 5.5 | 8.56 |
| Large Plate Chiller | 4.8 | 2.16 |
It see the latest price of each of the wort chillers on Amazon click on the links within the table. If you choose an option that requires a pump we recommend selecting one that is specifically made for homebrew and is food grade to avoid any risk of wort contamination. The one we recommend is one from Gile House Brew Supply Stainless Steel Head Magnetic Drive Wort & Beer Pump – 120V Food Grade Water Circulation Pump With In-line Switch because it is compact and easy to use.
What Do We Recommend?
For the beginner brewer that is just starting out, we would recommend that you purchase the larger of the two immersion chillers. This is because there are only a few minutes of difference between the cooling times but the immersion coolers are a lot easier to clean and they don’t require a pump. If you are a more experienced brewer making larger batches we would suggest using a large immersion chiller for maximum efficiency.