This post contains affiliate links which we are compensated for if a purchase is made. Using links costs you nothing and helps to support the ongoing creation of content. Thank you for using them.
What Is The Ideal Temperature To Brew Beer At? If you are brewing your first batch of beer one of the key consideration is what temperature to brew at and is there a problem if the yeast gets too hot or too cold?
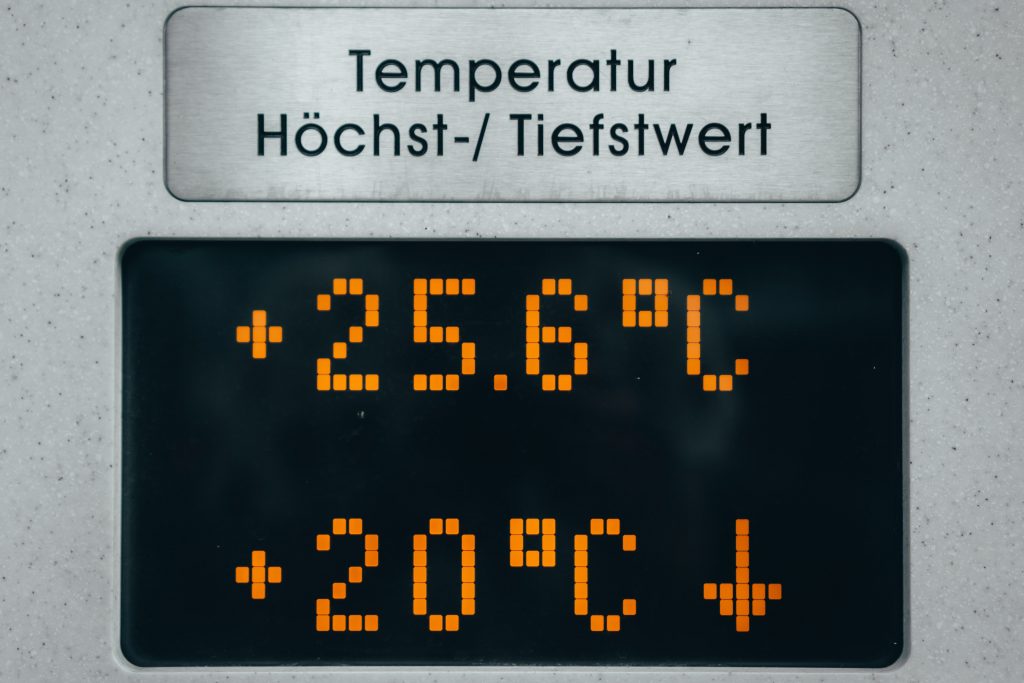
There are a number of variables that affect the optimum brewing temperature which include the beer and yeast type. However, the rule of thumb is that the brewing temperature should be around 68°F (20°C). This temperature suits generic yeasts that are supplied with beer tin concentrates which often specify fermenting temperatures around 68°F to 77°F (20°C to 25°C). These types of yeasts can tolerate slightly warmer temperatures but will begin to alter the flavour as the temperature increases.
When fermenting beer it is best to keep the beer at a cooler temperature. This is because at higher temperatures the yeast produces increase volumes of fermentation by-products such as esters and fusel alcohols. Esters are sweet-smelling compounds that commonly used in confectionary and can affect the flavor of the beer.
Fusel alcohols are larger alcohol molecules than ethanol, sometimes referred to as higher alcohols, that are thought to contribute to a harsh aroma and taste if found in too high a concentration in beer. As a result of this, it is best to maintain a cooler temperature as it will produce a cleaner tasting beer.
It is also important to note that the fermentation process exothermic (the brew gets hotter) so it is best to start the fermentation slightly below the target temperature. To read more about the extent of the exotherm click here.
What Happens If The Beer Gets Too Cold In The Fermentation Stage?
If the temperature gets too low in the fermentation stage the rate of reaction will slow and the yeast will become inactive but they will not die. The two issues associated with this are;
- An extended period in the fermenter increases the risk of contamination of the brew by things like bacteria.
- The second issue is that it is likely that the fermentation is incomplete, it must be completed before bottling otherwise there will be issues with carbonation in the bottle.
However, the stopping of fermentation midway through a batch is not an irretrievable disaster because simply bringing the temperature back up into the correct range will be enough to get the yeast going again. It will usually take a day or two for signs of fermentation to reappear.
How To Maintain The Temperature Of A Fermenter?
When fermenting beer it is much easier and simpler to control the temperature when the ambient temperatures are slightly below the target temperature of the beer because applying heat is much easier than applying cooling. So it is best to store the fermenter in a location where the temperature remains relatively stable and is not subject to major fluctuations in due to differences in the day or nighttime temperate climate or the turning on and off heating.
The simplest setup to use an Inkbird WiFi ITC-308 Digital Temperature Controller Thermostat. It makes things easy to control the temperature accurately and it provides maximum flexibility on what type of equipment your use to actually heat or cool the fermentation vessel because it has 2 power sockets that allow any heating or cooling device to be added.

Heat Options
There are two main options that can be used to heat a fermenter the first is a wrap-around heater. This is my preferred option because it provides even heat directly to the sides of the fermenter allowing greater temperature control across the entire batch. The wrap may be applied to any standard fermenter using the 2 velcro straps. When used in conjunction with an inkbird thermostat temperature control within 2 to 3 degrees can be expected. To check out the latest price on Amazon click here.
The second heating option is a heating pad that sits under the base of the fermenter and provides heat from the bottom. Most of these types of heating options are fairly low cost, but lack temperature controls and need to be plugged into an inkbird thermostat. The other disadvantage of this type of heating system is that you get greater temperature fluctuation with it compared to a wrap-type heater.
The reason for this is that the heat is only applied from the base so there are greater temperature differentials within the fermenter vessel and it takes a little longer for heat to be distributed around the vessel. This results in a lag between applying heat and the response of the thermostat.
However, many people do use this type product successfully in there brew, to check out one of the basic models on Amazon click here.
Cooling Options
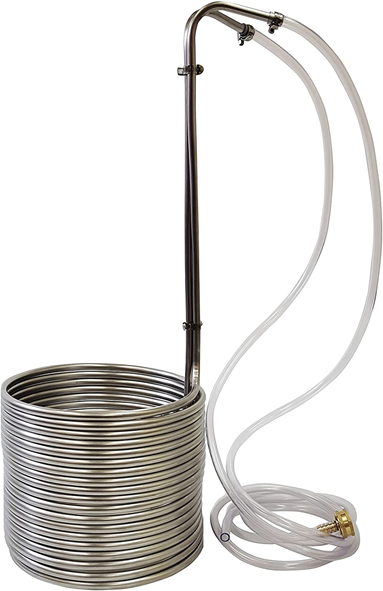
The simplest and lowest-cost way to cool a fermenter is using a wort chiller. A wort chiller is basically just a coil that can be placed in the fermenter to allow cool water to be run through the coil. As a wort chiller is a useful piece of equipment for other parts of the brewing process it will reduce the cost of your equipment set-up.
There are many different wort chillers available however to maximize its cooling capacity it is better to select one that has a longer coil as it will increase the amount of time cool water spends in the coil. This increases the degree of heat transfer significantly. The product we recommend for this job is shown in the image below, click here to see the latest price on Amazon.
To circulate the water through the chilling lines you will need a small pump. The best option to used is a bayite pump, as they are small (4 inches long), have a reasonable pumping capacity which will provide all the cooling power required and they are relatively low cost, click here to see the latest price on Amazon. Like the heating pad, they can be plugged into the inkbird thermostat so that the cooling kicks in only when required.
To maximize the cooling power of this set up it is best to have the water drawn from a small insulated ice bath. To ensure that you do not have to add ice too often to the bath I freeze water in old ice-cream containers as this allows me to create large blocks of ice that melt slower.
In addition to applying cooling, it is also advisable to insulate your fermenter to reduce the amount of heat loss or gain from the environment. This can be done with an insulated cooling bag that is capable of completely covering a 5-gallon fermenter. (See the image below) Click on the link here to see the latest price. The alternative to purchasing a commercially available cooler bag is to simply wrap the fermenter in old blankets.