
This post contains affiliate links which we are compensated for if a purchase is made. Using links costs you nothing and helps to support the ongoing creation of content. Thank you for using them.
What Size Batch Of Homebrew Is It Best To Start Out With? If you are just starting out with homebrew you may be wondering how much beer you can make in a batch and is there an ideal batch size to start with?
The ideal homebrew batch size to start out with is a 5 to 5.5-gallon batch. The reason for this is that it is the largest batch that can be made on a kitchen stovetop without the need to purchase special equipment. Larger batches are better because it takes approximately the same amount of time to make a batch of beer irrespective of the size. Additionally, most basic fermenters accommodate this batch size without the need to split the batch into more than one fermenter.
Additionally, many beginner brewers tend to rely upon recipe kits as they are convenient and easy to use. The vast majority of these kits are designed for 5-gallon batches.
The main issue with making large batches on the stove is that kitchen stoves lack sufficient heat capacity to boil the required volume of liquid. To achieve the required heat it necessary to purchase an outdoor burner. Additionally, many domestic kitchen stoves cannot physically accommodate the very large pots required to produce batches greater than 5 gallons.
How To Get Started With Home Brewing
The quickest and easiest way to get started with home brewing is to purchase starter kits, which are generally cheaper than buying individual components. The additional benefit of purchasing these kits is some of the better ones them come with the ingredients for your first batch which means that you have absolutely everything you need to get started.
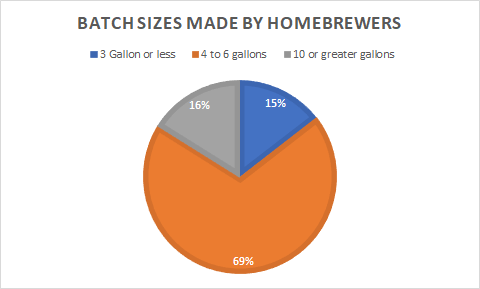
As mentioned above the ideal batch size for a beginner is 5 gallons however, it is possible to buy starter kits that are designed for 1, 2, or 3 gallons which in our view is not ideal. This view is consistent with a survey carried out by the American Homebrewers Association which showed that very few homebrewers made batches below 3 gallons. See the results below.
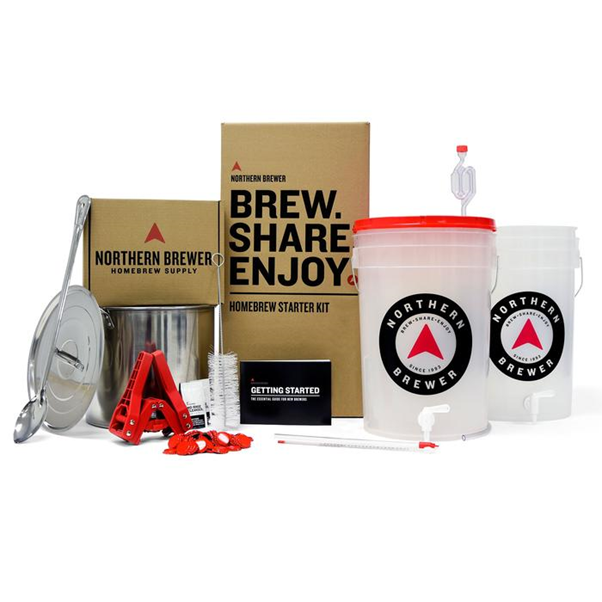
Of the homebrew kits available the one we would recommend is from Northern Brewers, which shown in the image below. The main reason for this is that it works out cheaper than any other kit available, though the price is higher than other kits available. This is because the kit features a stainless-steel brew kettle which is lacking from many other kits and also the ingredients to make your first batch. If a recipe kit and an alternative starter kit is purchased separately the cost will exceed the cost of a Northern Brewers kit. To see the latest price on Amazon click here.
Ways To Brew Beer
There are three ways in which homebrewers produce beer which are as follows
- Using a pre-prepared All-Grain Extract (essentially a beer flavor base)
- Using a Grain and Malt extract recipe (this style is included in the Northern Brewers starter kit)
- Using an all-grain recipe
The third style of recipe, All-Grain is the one which provides the brewer with greatest degree of control over the flavor of the beer. However, it also takes the longest to brew and is generally not recommended for beginners. This is because the initial cost of the equipment is significant and the steps are more complex.
Using All Grain Extracts (Flavour Bases)
For those that are want to make the occasional brew and just want a relatively quick and easy way to brew at home using prepared All Grain Extracts is the way to go. The process is very straight forward with the setting up of the fermentation taking less than an hour. The bottling time irrespective of the way you brew will be around 2 hrs.
To set-up a fermentation the following steps need to be taken;
- Sterilize the fermentation.
- Add 2 to 3 quarts (litres) of hot water to the fermenter.
- Add the extract to the fermenter. As the extracts have a very high viscosity the can will need to be rinsed several times to get all the extract out of the can. Using small amounts of hot water works best.
- Add sugar to the fermenter and stir the mixture until the sugar is dissolved.
- Add water to the fermenter to make up it upto 5 gallons. When adding water to fermenter the temperature should be adjusted to 68°F (20°C).
- Sprinkle the yeast on the surface of the solution in the fermenter.
- Put the lid of the fermenter and place the airlock in the hole in the top of the fermenter. The airlock should be half-filled with water.
The fermentation in most cases will take approximately 1 to 2 weeks to complete.
Brewing Using Grain & Extract Recipes
Grain/malt extract recipes are more complex than using all-grain extracts recipes, they will require more equipment (namely a brew pot) and they will typically take 2-3 hours to get the fermentation started. However, these types of recipes are a useful stepping stone for beginner brewers that are wanting to understand the fundamentals of the brewing process. There is a range of beer styles that available as recipe kits for you to try to click here to see some of the options click here.
To provide an indication the difference in the steps required here is a typical set of instructions that would come with one of the grain/malt extract recipe kits.
- Fill the clean pot with 2.5 gallons of cool water and heat on stove on a medium heat
- To steep the grains by transferring them into the mesh bag and tying a knot at the open end of the bag. There should be room for the grains to move freely within the bag allowing
- Place the bag in the pot for 20 minutes maintaining a temperature of 160 to 170 F.
- Remove the grain bag from the pot allowing it to drain over.
- Add 6 lbs Pilsen malt syrup and 1 lb Pilsen DME to the pot and stir until dissolved
- Add one oz of hops
- Heat the pot to maintain a slow rolling boil for 50 minutes.
- Add 0.5 oz Chinook hops and heat for a further 9 minutes
- Add a further add 0.5 oz hops and heat for another 1 minute.
- Cool the pot in a sink filled with cold water and allow the solution (wort) to cool.
- Transfer the solution (wort) into the fermenter make the volume up to the 5 gallons
- Test a sample of the solution with a hydrometer to get a specific gravity.
- Sprinkle the yeast onto the surface of the wort.
- Seal the fermenter and place the airlock in place.