
This post contains affiliate links which we are compensated for if a purchase is made. Using links costs you nothing and helps to support the ongoing creation of content. Thank you for using them.
How Much Does It Cost To Start Home Brewing? Are you keen to try out start home brewing and don’t know where to start, exactly what equipment you will need, how much it will cost, and even is it worth it this is the article for you. From personal experience, I can tell you that it is absolutely worth it particularly if you drink beer at home. This article will go through the absolute basics of how to get started. There is also a frequently asked questions section at the end of the article which will help you to get all the information you need. But if there is anything we have missed leave a comment to help use improve the article.
To be able to brew your first batch of beer you will typically need to spend $100 to $150USD to get started with the bare minimum equipment. The easiest way to dip your toe in the water is to buy a starter kit that will have the absolute minimum equipment you will need to get going. However, the starter kits do vary based on the size of the batch (I recommended 5-gallon starter kits) and should be selected based on how you want to brew.
After three successful batches have been generated from the equipment in a starter kit the initial outlay will have paid for itself. Each batch in a 5-gallon starter kit will produce around 2.5 cartons of beer. Most starter kits contain enough material to make one batch of beer. The ingredients of each subsequent batch will typically cost $20 to 30 dollars.
At the time of writing this article, the average cost of a carton of beer in the US was around $20 according to NBC and the cost of a starter kit was around $110 to see the latest price on Amazon click here. With the cost of ingredients for 2 subsequent batches, the total cost of producing your first three batches equates to around $150 and the cost of buying the equivalent amount of commercial beer would be approximately equal.
The Different Types Of Starter Kits
There are two basic ways to produce beer using a pre-prepared extract that is ready to ferment or using a grain & malt extract recipe. There are starter kits that are designed to suit both styles. The key difference is that using pre-prepared extracts is quicker, simpler, and easier to use, to start a fermentation will take around an hour, whereas grain/extract-based recipes will take around 3 hrs to start the fermentation due to the boil stages.
There are also starter kits for all-grain recipes which is the next step up in cost and complexity. All grain starter kits are generally not recommended for beginners as they require significantly more equipment that is more expensive.
Grain-based recipes generally provide greater control and flexibility over the brewing process than the more basic brewing methods covered in this article.
Brewing Using Beer Prepared Extracts
The absolute most basic and simplest way to brew is by brewing with a pre-prepared extract which essentially a flavour base for the beer you are making. The process is really simple and relatively quick to do. To setup a fermentation stage only takes around a 1hr and the bottling will take around 2 hrs.
The extracts are available in a range of beer styles, and cider and ginger beer extracts are also available. When starting out I would strongly recommend making basic beers as there is nothing worse than devoting time and money to making beer that is essentially unpalatable. I personally would recommend starting with Mexican-style beers as they will produce a reasonable beer every time.
The other type of extract that I have found is really reliable is ginger beer, it produces a quality product every time. With the apple and pear cider flavor bases, I have found that they produced a very dry result. If you like sweeter ciders lactose needs to be added to the brew as well, however even with the addition of lactose I haven’t been all that happy with the result.
If you only want to brew using an extract the Coopers’ kits can be purchased via Amazon which is specifically suited to an extract. The Coopers kits have a couple of pros and cons compared to the Northern Brewing Companies starter kits which are discussed later in the article.
Pros
- The fermenter has a conical shape bottom which reduces the amount of sediment that flows through into the beer producing a clearer product
- The kit includes PET bottles (other kits do not include bottles)
Cons
- The kit does not include a bottle capper. While a capper is not required for the PET bottles it is useful to have as it allows glass beer bottles with crown seals to be used.
However, bottle cappers that are similar to those that are supplied in the Northern Brewing starter kits can be purchased fairly cheaply on Amazon, click here to see the latest price.
To provide an indication the complexity of the process the steps involved in the set-up of the fermentation is provided below;
- Sterilize the fermentation.
- Add a couple litres of warm to hot water to the bottom of the fermenter.
- Open the can of extract with a can opener and pour the extract into the fermenter. As the extracts have a treacle-like consistency you need to rinse the can with water several times to get all the extract out. The most efficient way to do this is with small amounts of boiling water. The water needs to be swirled around to dissolve the extract in the water, this will need to be done several times to get all the extract out.
- Once all the extract is in the fermenter the sugar needs to be added and the contents should be stirred to ensure that the sugar is dissolved and the extract is thoroughly mixed in.
- Add water to the fermenter to make up the required amount of volume. At this stage, the temperature of the fermenter should be adjusted by adding either cold or warm water as required. The recommended temperature is typically around 68°F (20°C) but this can vary with the specific extract.
- Measure the specific gravity of the solution using a hydrometer. This is important if you want to measure the alcohol content of the batch at the end of the fermentation process. (for standard brewing kits the alcohol content is usually around 4.5%)
- Add the yeast and yeast nutrient (not all extract include this) to the fermenter. Just sprinkle the yeast on the surface of the fermenter, there is no need to stir it in.
- Seal the lid of the fermenter and place the airlock for the top of the fermenter. The airlock should be a third or half-filled with water.
The fermentation in most cases will take approximately 1 to 2 weeks to complete.
Brewing Using Grain & Extract
As mentioned earlier in the article brewing using grain/malt extract recipes is more complex than using extracts however purchasing a starter kit enables a beginner brew to understand the brewing process more thoroughly and sets you on a path to developing a better understanding of how to control flavors and create your own unique craft beers.
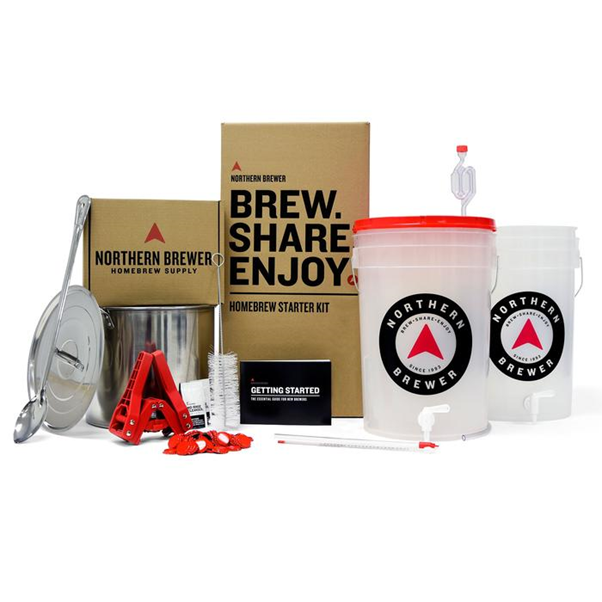
The basic starter kit from Northern brewing provides you with all the equipment required to make beer along with ingredients to make one batch of beer. The equipment list in this type of starter kit varies quite a bit from the Coopers one mentioned earlier and general is better value in my view. Click here to see the latest price.
The kit has several advantages over the Cooper’s starter kit;
Pros
- The kit features a stainless-steel brew kettle for preparing the wort
- The kit includes a capper
- The Kit can be used to produce either all extract recipes or the gain/extract recipes which allow you to choose the brew method you what.
Cons
- The kit does not include bottles. This is not a big issue as bottles can be kept after consuming commercial beer, to read more about the types of bottles that are suitable click here. Or they can be purchase separately
- The fermenter is a flat-bottomed bucket which is not as good for removing sediment from the batch as a conical bottom vessel.
To provide an indication the difference in the set-up of a fermentation using a is provided below;
- Fill the clean pot with 2.5 gallons of cool water and heat on stove on a medium heat
- To steep the grains by transferring them into the mesh bag and tying a knot at the open end of the bag. There should be room for the grains to move freely within the bag allowing
- Place the bag in the pot for 20 minutes maintaining a temperature of 160 to 170 F.
- Remove the grain bag from the pot allowing it to drain over.
- Add 6 lbs Pilsen malt syrup and 1 lb Pilsen DME to the pot and stir until dissolved
- Add one oz of hops
- Heat the pot to maintain a slow a slow rolling boil for 50 minutes.
- Add 0.5 oz Chinook hops and heat for a further 9 minutes
- Add a further add 0.5 oz hops and heat for another 1 minute.
- Cool the pot in a sink filled with cold water and allow the solution (wort) to cool.
- Transfer the solution (wort) into the fermenter make the volume up to the 5 gallons
- Test a sample of the solution with a hydrometer to get a specific gravity.
- Sprinkle the yeast onto the surface of the wort.
- Seal the fermenter and place the air lock in place.
Conclusion
In my view, the Northern brewing companies are the better of the two options available as the equipment contained within the kit allows brewing of both extract and grain/malt extract to be completed. Given that the kits cost approximately the same North Brewer Kit is the better choice.
Frequently Asked Questions
How Long………
How Long Does It Take To Make A Batch?
It typically takes around 2 weeks for starting a batch to bottling. The first day requires you set-up the fermenter, and then it will take one to two weeks to ferment the beer and then the last day will require you to bottle the beer.
How Long Before You Can Drink Beer After It Is Bottled?
You usually need to wait 2 weeks at a minimum though I would recommend waiting 4 weeks. The first 2 weeks is required to ensure that the beer is full carbonated. During this period the beer should be stored at room temperature to ensure that the yeast remains active in the beer.
How Long Does Homemade Beer Last?
Homebrew can typically be stored for at least 12 months, however, I have drunk batches that are much older than that
How Much Does It Cost……..
How Much Does It Cost To Make A Batch Of Homebrew?
It usually costs between $25 to 45 for the materials to brew a batch. The cost can vary depending up what you are making ciders and ginger beers can be cheaper if you are making them from scratch. Click the links for recipes.
Fermentation Questions……….
What Temperature Should Your Fermenter Be?
Fermentation in most cases should be conducted at a temperature around 68F (20C), though the recommended temperatures can vary depending upon the type or recipe being used. To learn more click here.
How Do I Know When The Fermentation Is Complete?
The most obvious sign that the fermentation is coming to an end is the airlock stops bubbling, I usually allow a couple days afterward before bottling. The other way to confirm is to take hydrometer readings 2 days apart if they are the same and the reading 1.01 to 1.02 for beer or around 1.00 for cider then fermentation is complete. To learn more click here.
Do You Have To Use Brewer Sugar (can your use white sugar or caster sugar)?
You can use either white or caster sugar to produce alcohol however some brewers say that can affect flavor, I personally haven’t noticed. To read more about this click here.
Bottling Questions………….
Can You Reuse Old Beer Bottles?
Yes, but they need to be crown seals rather than twist tops. It is also preferable to use amber bottles rather than clear glass as the beer will last longer. To read more about it click here.
Can You Use Plastic PET Bottles?
Yes, but they will not protect the beer as long as glass. Additionally, plastic bottles are permeable to carbon dioxide, so carbonation within the bottles will be lost over time. To read more about it click here.
Why Is Sugar Added To Bottles Prior To Bottling?
The sugar is added to the bottles to carbonate the beer. Yeast within the beer will convert the sugar to ethanol and carbon dioxide carbonating the beer over time.
Other Questions……………..
Does All Home Brew Have Sediment In It?
All homebrew, unless it is force carbonated in a keg will have some degree of sediment due to the natural carbonation process. There is a number of steps that can be taken to reduce the volume of sediment during the beer-making process and it is possible to still produce a clear product in the final glass. To read more about this click here.