This post contains affiliate links which we are compensated for if a purchase is made. Using links costs you nothing and helps to support the ongoing creation of content. Thank you for using them.
Can You Make Apple Cider From Store Brought Apple Juice? Do you like Apple Cider? Have ever wondered if it was possible to make your own from apple juice from the local grocery store? The answer is yes, this article is designed to provide you with all the information you will need to make your very own apple cider including how to select ingredients, the equipment you will need, and step by instructions on how to make your own cider.
Apple Cider can be made from store brought apple juice provided that it is free from preservatives. This is important because the preservatives present within some store-bought apple juice are designed to prevent any microorganisms from starting to multiply which includes yeast. The presence of these additives will inhibit the fermentation process required when you add yeast to create alcohol.
If you are unsure whether the apple juice is suitable look at the ingredient list on the packaging for any ingredients that contain the names sulfite, sorbate, or benzoate. If any of these names appear on the ingredient list then the apple juice is not suitable for making cider.
If you are having trouble finding a suitable source of apple juice the other alternative is to make the apple cider from a kit. The kits are designed to make around 5 gallons of cider and will cost about around the same to produce as purchasing the apple juice from the local store. To see the latest price on Amazon click here.
However, it is important to note that the kits will produce an extremely dry product after fermentation that will need to be sweetened after the fermentation. Sweeteners are not included in the kit and will need to purchased separately. The instructions on sweetening apple cider provided in the “How To Make Apple Cider” section of the article will equally apply to apple ciders made from kits.
Does It Matter If The Apple Juice Is Pasteurized?
The apple juice used in the cider can either be pasteurized or unpasteurized though I would generally recommend using pasteurized apple juice as pasteurization removes any wild yeasts that are present in the juice that can start the fermentation process.
What Will The Alcohol Content Of The Cider Be?
The amount of alcohol that will be produced in the cider will be dependent of the sugar content of the apple juice you are using. Commercially sold apple juice will have the sugar content listed in a table on the size of the packaging. An example of a label is shown below.
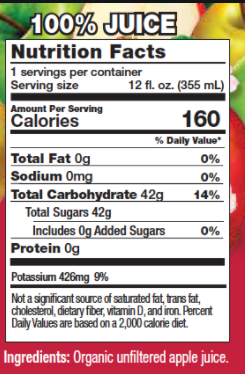
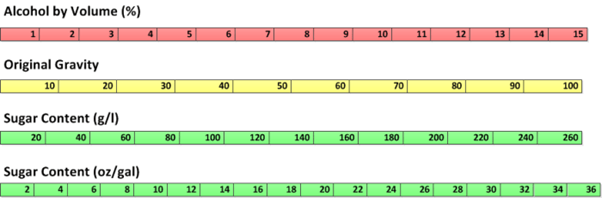
To calculate the potential alcohol content the alcohol volume chart can be used below. To use this chart the sugar content needs to be converted to either grams per litres or ounces per gallon. Those values can then be compared with the alcohol volume chart above to estimate the % alcohol.
Example
Using the label above 42g from the Total Carbohydrate line is divided by 355ml which has been converted into litres (0.355). The grams per litre of sugar in the Apple Juice is 118g/L, by comparing the grams per litre line of the chart above with the alcohol line will allow the alcohol content to be estimated at 6.6%.
The alcohol content of the cider can be increased or decreased by either adding additional sugar or diluting the apple juice with water. Generally, I recommend that you shoot for around 4 to 4.5% alcohol for no other reason than the alcohol level is similar to commercial beer. This ensures that the person that consumes the cider has some idea of how many bottles they can consume before driving.
Do I Need Any Special Equipment To Make The Cider?
The equipment required to make Cider is much the same as what is required to make beer or ginger beer. There are four pieces of equipment I would highly recommend purchasing;
- a fermenter
- airlock
- filling wand
- A capper
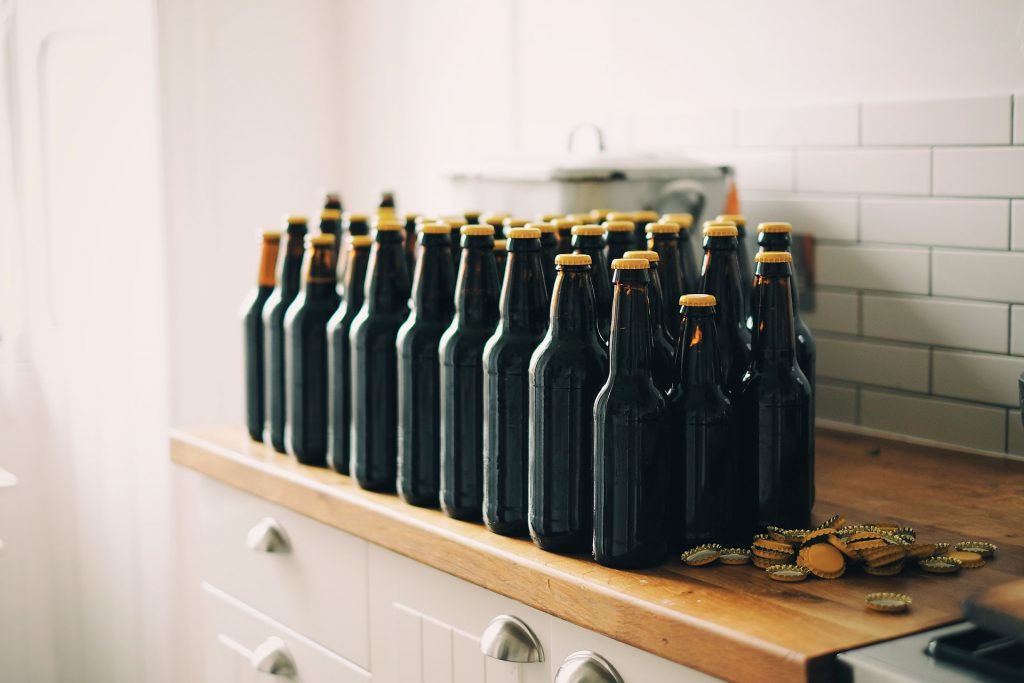
These items are relatively low-cost, make it much easier to make cider. They will pay for themselves after the first batch or two. This equipment will allow you to make a 5-gallon batch that will produce make 60 to 65 – 12 fl oz (355ml) bottles of apple cider.
This is the most common batch size used by homebrewers and it will ensure that you can use this equipment to also make beer recipe kits up as well. An example of these kits can be seen if you click on the link to Amazon.
The number of bottles produced may seem like a lot at however, apple cider can be store for at least a year and often much longer if stored in a cool dark place.
Fermenter
The fermenter is the single most important piece of equipment that you will need if you want to make cider, beer, or ginger beer. The cheapest basic model that has a tap at the bottom is available from Home Brew Ohio. Having a tap on the bottom is important because it allows the bottles to be filled directly from the fermenter without the need for a siphon or ladle. A picture of the fermenter is shown below, click here to see the latest price on Amazon.

Airlock
When fermenting your brew you will need an airlock that allows the gas to leave the fermenter while preventing bacteria from getting in. When in use the airlock is half-filled with water to prevent the bacteria from entering There are two main types, the S-type and a 3 piece airlock, S-type are slightly cheaper but 3 piece airlocks are easier to clean, however, there isn’t that much difference between the two, click the links to see the latest price on Amazon.
Filling Wand
The filling wand is a piece of equipment, that is not absolutely essential for filling bottles but it certainly makes filling the bottles a lot faster and easier as it provides a consistent and accurate fill level. Filling wands are basically tubes that have the open end connected to the fermenter tap and a pressure-activated seal that releases the cider into the bottle when the seal is pushed against the bottom of the bottle.
When the wand is removed from the bottle that is filled the level in the bottle goes down leaving the correct amount of headspace. There are basic types that are around 1ft long that connect directly to the tap or you can get ones that come with a tube which is better because you can leave the bottles in the carton and place the wand into the bottle one at a time. To compare the prices on Amazon of the basic model and the models with a tube click on the links. To read more about the differences between fillers click here.
Capper
Cappers are an extremely useful piece of equipment that is used by homebrewers to seal crown seal beer bottles which are ideal for storing cider. The capper allows you to store your cider in glass bottles rather than plastic bottles. Glass bottles allow the cider to be stored longer as plastic bottles are permeable to carbon dioxide, to learn more about this click here.
The cheapest capper available is the Red Baron, which is shown in the picture below. They are a dual handle type that works well but is not as fast as other cappers which are significantly more expensive. If you are just making the occasional batch the Red Baron is the one to go for, click here to see the latest price on Amazon.

How To Make Apple Cider?
Apple cider is relatively quick and easy to make compared to beer or ginger beer when you are making it from the juice. The fermenter can be set up ready to go in under an hour. The fermentation will take one to two weeks to complete and then bottling will take 2 hours or so with the main job being the washing of bottles.
Before you start making your batch you should have all the equipment, ingredient, and bottles ready to go. For bottles, you can use plastic drink bottles but it is far better to use beer bottles with a crown seal. These can be purchased new however the easiest way is to start collecting them for friends or neighbors.
Ingredients
- 4.5 to 5 Gallons Of Apple Juice
- Yeast
- Yeast Nutrient
- Erythritol or Xylitol
- Sugar Or Carbonation Drops
- Bottle Caps
Notes About Ingredients
- Yeast – There are many different yeasts available that can be used to produce cider. The one that is specifically designed for is “white labs 775” for which there is a link above. However, you can also just use baker’s yeast from the local grocery store.
- Yeast Nutrients – Are sometimes added to ciders because there are very few things in apple juice that the yeast can feed on apart from sugar, however, I know there are a number of recipes on the internet that do not use them.
- Erythritol or Xylitol – Are artificial sweeteners are used to adjust the flavor of the cider. Artificial sweeteners are used because they are non-fermentable which means the yeast will not convert them to alcohol. Adding fermentable sugar like white sugar will not sweeten the flavor because their conversion to alcohol will result in a loss of sweetness. There are several different types of artificial sweeteners that are available. These are recommended because they do not leave an aftertaste.
- Carbonation Drops – Are essentially like boiled lollies that are added to the bottle just before filling. They introduce a small amount of sugar to the cider which is fermented in the bottle after it is sealed. The fermentation process produces carbon dioxide that carbonates the drink. Carbonation drops are a convenient way to add sugar to the bottle as one drop is the right amount for a 12 Fl oz (355ml) bottle. However, this effect can also be created by adding white sugar. The recommended addition rates for refined white sugar are provided in the table below.
| Bottle Size | Grams/Ounces | Teaspoons* |
| 330 ml | 3.6 g/0.12 oz | 1/2 tsp |
| 750 ml | 7.2 g/0.25 oz | 1 tsp |
Method
Step 1 – Clean and sanitize the fermenter, its lid and the airlock. To sanitize start by washing and removing any excess dirt. For the final rinse you can use very hot water to kill any bacteria or add a teaspoon of bleach. After the final rinse do not dry the inside of the fermenter as you reintroduce bacteria.
Step 2 – Pour the apple juice into the fermenter.
Step 3 – Add the yeast and yeast nutrients. Typically you only need 5 to 7 grams which can be sprinkled across the surface of the apple juice. There is no need to stir it in.
Step 4 – Seal the fermenter by placing the lid on top and placing the airlock into the hole in the lid. The airlock should be half-filled with water. Within 24 hrs you should expect to see the airlock bubbling which is a good indication fermentation has started. During the period of fermentation, usually one to two weeks, it best that the fermenter remains at a temperature of approximately 68F (20C).
Step 5 – Once fermentation is complete the next stage is to collect a sample of the cider in a kitchen measuring jug or any vessel that has volume marking on the sides to allow the volume of cider you have to be measured. It is best to have a volume of around half a quart (half a litre) as this will allow you to be more accurate with your calculations.
Step 6 – Prepare a sweetening solution by adding 60 gms Erythritol or Xylitol to 200 gms of boiling water.
Step 7 – Adjust the flavor of the cider to your preference by weighing small amounts of the sweetening solution. Note: You must weigh the amounts inaccurately to ensure you are able to calculate the amount of sweetener that needs to be added to the full batch.
Step 8 – Add the sweetener to the batch and recheck the flavor. Note: It is ideal for you to transfer it to a second container with a tap as the fermenter will have a whole heap of sediment at the bottle of the vessel. If you only have one vessel you will need to leave the cider in the fermenter for a few more days to allow any sediment to resettle before bottling.
Step 9 – Prepare the bottles for filling by cleaning and sanitizing. Once the bottles are ready add white sugar or carbonation drop(s) to the bottle. See the table above for quantities.
Step 10 – Fill the bottles with the cider leaving an inch of so of headspace at the top of the bottle and seal. Once sealed store the bottles at room temperature for around 2 weeks. This will allow the bottles to carbonate before drinking. After that initial period, it is best to store the bottles in a cool dark place.